Bright Star Quilt Workshops/Sewing-Ins
Bright star quilt workshops/sew-ins will be held at the McIntire Rescue Squad building (828 McIntire Rd) from 1:00 - 4:00 pm May 20 and June 17. Please let Robin ([email protected]) know if you plan to come or if you have questions.
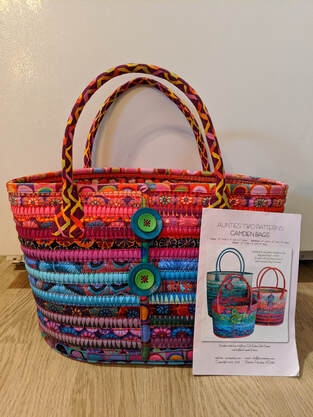
Camden Bag Sew-Along
Before the pandemic, Moira and Ellen MacAvoy led a series of workshops to guide members through making the Camden Bag by Aunties Two Patterns. Workshops concentrated on the Small size, which is about 13” long by 9” wide by 9” tall (plus handles). The bag has an oval-shaped bottom, an open top, and two handles. It makes a sturdy shopping tote or project bag. One full-size jellyroll is enough for two bags, so you can use a smaller jellyroll, split a large one with a friend, or make two bags! Everyone’s bag will look different, depending on the choice of fabrics and buttons.
The original workshop included four live demo sessions. Information on each session was placed here after it had been deliverd. Those summaries remain below for those who want to go on the adventure of making their own bag.
The pattern for Aunties Two Patterns Camden Bag is available on Amazon, Missouri Star Quilt Company, and Etsy. Notes on selecting the correct pattern are provided under Section 1 below.
The project requires machine and hand sewing skills. Your machine needs to be able to do straight and zigzag stitching, and the hand stitching is functional (not decorative embroidery)
Session One: Supplies
Gathering up the supplies for this pretty bag may be the hardest part of the project. I know it looks like an enormous list, but it has a lot of basic things like pins and needles.
After I list the supplies, I will give you ideas for where to find them!
My supply list differs from the list on the pattern for three reasons:
1) The pattern gives multiple options for three different sizes. I am only giving supplies for size Small, with fewer options.
2) There are several things listed under the heading of “Other Tools” on the pattern that I just didn’t find necessary.
3) Since the pattern was published, the designers have created some handy kits that allow you to buy some of the supplies bundled together. I have listed the supplies both ways. You may have some of the supplies at home already, so it may not make sense to buy the kits. Or, the kits may not be available when and where you are shopping. Either way, you will be fine. Just read carefully so that you don’t spend the money on duplicate items.
The Pattern: Aunties Two Patterns Camden Bags pattern (updated version). Please note that there is an older version of this pattern for sale with some online vendors. Do not buy that version. Buy the one that is pictured on our website. It has a photo of three bags (small, medium, large). The older version has a photo of four bags (two small, two large). I will not be following the directions for the older pattern.
Before you buy the pattern, read about the option below, under the heading Handles. You have the option of purchasing the pattern bundled with a handle kit through some vendors. (Option 3 under Handles). Or, you can buy the pattern and handles separately.
Other Supplies:
Duet Fuse II: One roll of Duet Fuse II by Bosal (it’s a double-sided fusible batting). The package with the precut 2 ¼” strips in the 20 yard roll is just enough for the Small size. If you buy the 2 ¼” strips in the 25 yard roll, you will have extra (save for the next one!).
Camden Bag Bottoms: One package of precut Camden Bag bottoms. The package has two bottoms, and you need two bottoms for each bag. The pattern has directions for purchasing a special ruler and cutting your own bottoms. They read like a math problem that I was unable to solve on a geometry exam, and I won’t be able to help you with that. The precut bottoms are readily available and cost less than the special ruler.
Threads: For the machine sewing, you need regular machine sewing thread, which is 50 weight and 2-ply. Use a good quality thread because you will be zigzagging through layers. A variegated thread is a nice choice because it will blend with different fabrics. Plan on a cone, a larger spool or several small ones.
For the hand sewing, you will need heavy-duty cotton thread such as Aurifil 12 weight. You will use this for final assembly of the pieces into a finished bag.
Handles: You have three options for getting the tubing and interfacing. All get you the same materials. Pick ONE:
1) 5 yards of plastic tubing (.170 ¼” Polyethylene) and ¾ yard of non-fusible stiff interfacing (Peltex or Craf-tex).
2) OR…you can purchase the Aunties Two Pattern Happy Handles Kit, saving yourself a trip to the plumbing section of the hardware store.
3) OR…you can purchase the Aunties Two Pattern Camden Bag with Handle Kit.
Buttons: Two or more large decorative buttons.
Fabric: For the strips, you will need 16 strips that are cut 2 ½” wide by 42” long. One regular size Jelly Roll (or Bali Pop) is enough for two Small bags. A small Jelly Roll has enough for one Small bag.
For the handles, binding, and bag bottom, you will need 1 yard of fabric.
Keep in mind that you will be doing machine and hand sewing through multiple layers…I recommend that you choose some fabrics with a busy pattern, unless your stitching is perfect. You can repeat fabrics; you don’t need 16 completely different fabrics, just some variety.
Tools:
A sewing machine capable of straight stitching and zigzagging through batting.
Microtex needle, size 90/14
Denim (jeans) needle, size 110/18
Long pins such as flower-head style
Clips such as Clover Wonder clips (nice to have, but not essential)
Scissors, larger and small
Seam ripper
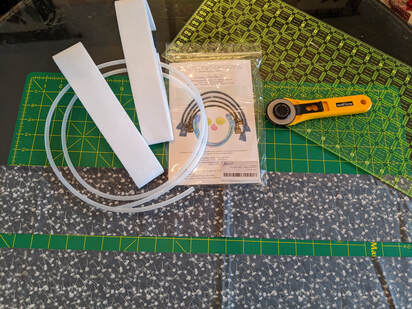
Rotary cutter (either 45 mm or 60 mm size will work) and matching blade
Rotary cutting mat. I used a size 18” by 24”
Acrylic ruler for use with rotary cutter and mat. A variety of sizes can work
Tape measure at least 42” long
Chalk marking pencil
Milliner’s needle, size 7 for hand sewing (or similar larger long needle)
Iron that you don’t mind using with fusible batting. Two options:
1) Use a Teflon bottomed iron such as a Steamfast Travel iron. The adhesive will not stick to that iron.
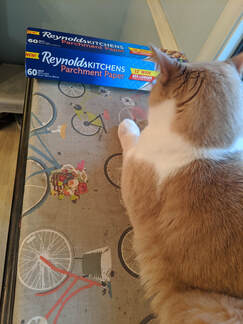
2) Use your regular iron. The pattern recommends that you use parchment paper or a Teflon pressing sheet to prevent the adhesive from sticking to your iron. I tried that with my regular iron and found it to be clumsy to manage the pressing sheet. So, I ironed as carefully as I could and then cleaned the adhesive off the bottom of my hot iron with a dryer sheet before using the iron on anything else. Just keep the adhesive off your ironing board, or it will end up looking as bad as my ironing board.
Where to find Supplies and Tools:
There are basically six places to find supplies/tools
1) Your house. You may have some Jelly Rolls (precut strips that are just the length and width you need). Or, you may actually have uncut fabric at your house! You only need to cut 16 strips that are 2 ½” by 42”.
2) Your local quilt shop. They will not have all the supplies, but will have a good selection of Jelly Rolls, Bali Pops, thread, and miscellaneous supplies.
3) You local big box store such as Joann’s. They have the small Jelly Rolls for about $15, right in side the door. Joann’s is also good for tools and notions.
4) Online sellers such as Amazon, Missouri Star Quilt Company, and many Etsy shops, just to name a few. I have found the pattern (with and without the handle kits), handle kits separately from the pattern, bag bottoms, and lots of Jelly Rolls online.
5) The Mid-Atlantic Quilt Show. There is always a vendor selling the Aunties Two patterns, the Bosal products, etc. Do I really need to
say it…you can buy fabric there, too!
6) A hardware store such as Lowe’s or Home Depot, the plumbing section (for the plastic tubing).
Don’t worry about the circle-cutting tool and graph paper…you aren’t making our own bag bottoms; you are buying a pre-cut bottom.
The original workshop included four live demo sessions. Information on each session was placed here after it had been deliverd. Those summaries remain below for those who want to go on the adventure of making their own bag.
The pattern for Aunties Two Patterns Camden Bag is available on Amazon, Missouri Star Quilt Company, and Etsy. Notes on selecting the correct pattern are provided under Section 1 below.
The project requires machine and hand sewing skills. Your machine needs to be able to do straight and zigzag stitching, and the hand stitching is functional (not decorative embroidery)
Session One: Supplies
Gathering up the supplies for this pretty bag may be the hardest part of the project. I know it looks like an enormous list, but it has a lot of basic things like pins and needles.
After I list the supplies, I will give you ideas for where to find them!
My supply list differs from the list on the pattern for three reasons:
1) The pattern gives multiple options for three different sizes. I am only giving supplies for size Small, with fewer options.
2) There are several things listed under the heading of “Other Tools” on the pattern that I just didn’t find necessary.
3) Since the pattern was published, the designers have created some handy kits that allow you to buy some of the supplies bundled together. I have listed the supplies both ways. You may have some of the supplies at home already, so it may not make sense to buy the kits. Or, the kits may not be available when and where you are shopping. Either way, you will be fine. Just read carefully so that you don’t spend the money on duplicate items.
The Pattern: Aunties Two Patterns Camden Bags pattern (updated version). Please note that there is an older version of this pattern for sale with some online vendors. Do not buy that version. Buy the one that is pictured on our website. It has a photo of three bags (small, medium, large). The older version has a photo of four bags (two small, two large). I will not be following the directions for the older pattern.
Before you buy the pattern, read about the option below, under the heading Handles. You have the option of purchasing the pattern bundled with a handle kit through some vendors. (Option 3 under Handles). Or, you can buy the pattern and handles separately.
Other Supplies:
Duet Fuse II: One roll of Duet Fuse II by Bosal (it’s a double-sided fusible batting). The package with the precut 2 ¼” strips in the 20 yard roll is just enough for the Small size. If you buy the 2 ¼” strips in the 25 yard roll, you will have extra (save for the next one!).
Camden Bag Bottoms: One package of precut Camden Bag bottoms. The package has two bottoms, and you need two bottoms for each bag. The pattern has directions for purchasing a special ruler and cutting your own bottoms. They read like a math problem that I was unable to solve on a geometry exam, and I won’t be able to help you with that. The precut bottoms are readily available and cost less than the special ruler.
Threads: For the machine sewing, you need regular machine sewing thread, which is 50 weight and 2-ply. Use a good quality thread because you will be zigzagging through layers. A variegated thread is a nice choice because it will blend with different fabrics. Plan on a cone, a larger spool or several small ones.
For the hand sewing, you will need heavy-duty cotton thread such as Aurifil 12 weight. You will use this for final assembly of the pieces into a finished bag.
Handles: You have three options for getting the tubing and interfacing. All get you the same materials. Pick ONE:
1) 5 yards of plastic tubing (.170 ¼” Polyethylene) and ¾ yard of non-fusible stiff interfacing (Peltex or Craf-tex).
2) OR…you can purchase the Aunties Two Pattern Happy Handles Kit, saving yourself a trip to the plumbing section of the hardware store.
3) OR…you can purchase the Aunties Two Pattern Camden Bag with Handle Kit.
Buttons: Two or more large decorative buttons.
Fabric: For the strips, you will need 16 strips that are cut 2 ½” wide by 42” long. One regular size Jelly Roll (or Bali Pop) is enough for two Small bags. A small Jelly Roll has enough for one Small bag.
For the handles, binding, and bag bottom, you will need 1 yard of fabric.
Keep in mind that you will be doing machine and hand sewing through multiple layers…I recommend that you choose some fabrics with a busy pattern, unless your stitching is perfect. You can repeat fabrics; you don’t need 16 completely different fabrics, just some variety.
Tools:
A sewing machine capable of straight stitching and zigzagging through batting.
Microtex needle, size 90/14
Denim (jeans) needle, size 110/18
Long pins such as flower-head style
Clips such as Clover Wonder clips (nice to have, but not essential)
Scissors, larger and small
Seam ripper
Rotary cutter (either 45 mm or 60 mm size will work) and matching blade
Rotary cutting mat. I used a size 18” by 24”
Acrylic ruler for use with rotary cutter and mat. A variety of sizes can work
Tape measure at least 42” long
Chalk marking pencil
Milliner’s needle, size 7 for hand sewing (or similar larger long needle)
Iron that you don’t mind using with fusible batting. Two options:
1) Use a Teflon bottomed iron such as a Steamfast Travel iron. The adhesive will not stick to that iron.
2) Use your regular iron. The pattern recommends that you use parchment paper or a Teflon pressing sheet to prevent the adhesive from sticking to your iron. I tried that with my regular iron and found it to be clumsy to manage the pressing sheet. So, I ironed as carefully as I could and then cleaned the adhesive off the bottom of my hot iron with a dryer sheet before using the iron on anything else. Just keep the adhesive off your ironing board, or it will end up looking as bad as my ironing board.
Where to find Supplies and Tools:
There are basically six places to find supplies/tools
1) Your house. You may have some Jelly Rolls (precut strips that are just the length and width you need). Or, you may actually have uncut fabric at your house! You only need to cut 16 strips that are 2 ½” by 42”.
2) Your local quilt shop. They will not have all the supplies, but will have a good selection of Jelly Rolls, Bali Pops, thread, and miscellaneous supplies.
3) You local big box store such as Joann’s. They have the small Jelly Rolls for about $15, right in side the door. Joann’s is also good for tools and notions.
4) Online sellers such as Amazon, Missouri Star Quilt Company, and many Etsy shops, just to name a few. I have found the pattern (with and without the handle kits), handle kits separately from the pattern, bag bottoms, and lots of Jelly Rolls online.
5) The Mid-Atlantic Quilt Show. There is always a vendor selling the Aunties Two patterns, the Bosal products, etc. Do I really need to
say it…you can buy fabric there, too!
6) A hardware store such as Lowe’s or Home Depot, the plumbing section (for the plastic tubing).
Don’t worry about the circle-cutting tool and graph paper…you aren’t making our own bag bottoms; you are buying a pre-cut bottom.
Session Two: Preparing and Sewing Strips
Overview of Session Two: I assume that everyone is using the updated version of the pattern, shown above. When I refer to pattern pages, they are pages on the updated pattern. By the end of Session Two, you will have completed almost everything on pages 2 and 3 of the pattern.
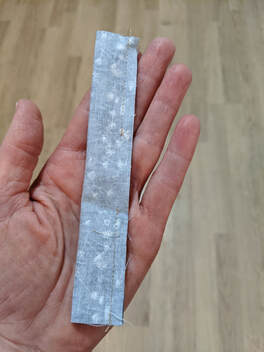
Your steps for this session are to: (1) fuse the fabric strips to the Bosal strips, (2) straight stitch the individual strips to make “tubes”, (3) zigzag tubes together.
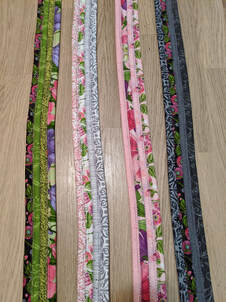
By the end of Session Two you will end up with a rectangle made of 16 stitched tubes that measures approximately 9” by 42”. See Photo 7 below.
Here we go…
Overview of Session Two: I assume that everyone is using the updated version of the pattern, shown above. When I refer to pattern pages, they are pages on the updated pattern. By the end of Session Two, you will have completed almost everything on pages 2 and 3 of the pattern.
Your steps for this session are to: (1) fuse the fabric strips to the Bosal strips, (2) straight stitch the individual strips to make “tubes”, (3) zigzag tubes together.
By the end of Session Two you will end up with a rectangle made of 16 stitched tubes that measures approximately 9” by 42”. See Photo 7 below.
Here we go…
Step 1 - Fuse the Strips:
Follow the pattern directions (page 2) for fusing the fabric strips to the Bosal strips…and, check out the visual aids below, for more help.
Step 1 - Fuse the Strips:
Follow the pattern directions (page 2) for fusing the fabric strips to the Bosal strips…and, check out the visual aids below, for more help.
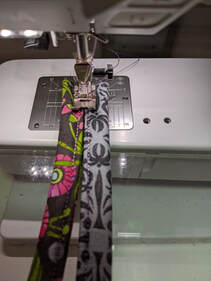
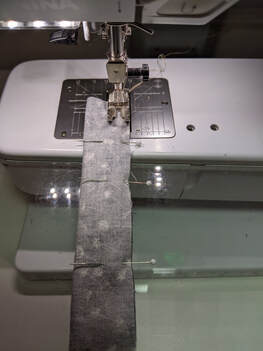
Step 2 - Straight Stitch to Make Tubes:
This is covered on Page 2, under the heading SEWING DIRECTIONS. You can use a general-purpose foot on your machine, or you may prefer a walking foot. Note that you want to use your Denim (Jeans) size 110/18 needle for this. I have had several questions about this needle, so let me clear them up here:
1-A Denim needle is the same thing as a Jeans needle.
2- A size 110 needle is the same as a size 18.
3-Not every size 110/18 is a Denim (Jeans needle). If the needle is not labeled Denim (Jeans) it is not a Denim (Jeans) needle. If you have a Universal or Microtex or Leather size 110/18, you don’t have a Denim (Jeans) and you need to buy one in order to punch through all the layers. Don’t use a Leather needle; that is deigned for leather and will ruin your fabric.
4- You don’t need to buy the specific brands of needles listed on the pattern (Inspira, Janome). But you do need a Denim (Jeans) needle. And it should be a size 110/18. A size 100/16 is not the size you need.
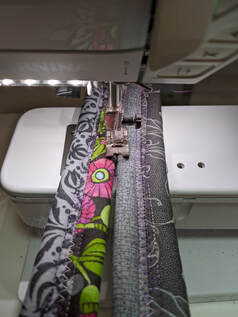
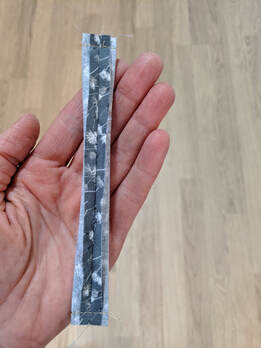
Step 3 - Zigzag the Tubes Together:
Directions start at the bottom of page 2 and continue on pattern page 3.
Helpful Hint before you get started sewing the tubes together: You probably have some variation in the length of your 2 ½” strips. You will note that, on page 3 of the pattern, you are told to make sure you don’t let the fabric tubes get stretched unevenly as you are zigzagging them together. Great…but, how do you know the tubes are being stretched out of shape if you start with tubes of all different lengths? Here is my big tip: After you have made the tubes, but BEFORE you sew any of the tubes together, trim them all to 42”. That way, you can line up the ends of the tubes as you are sewing. In a later step, you will be trimming down to 40”, so you will still have plenty of length to work with after trimming to 42” now.
Trouble Shooting: If your machine is skipping stitches on the zigzag, you can read the tips included in the pattern! Note that directions tell you to SEW SLOWLY. You are asking a lot of your machine, and it will skip stitches on the zigzag if you start zipping along. If you have tried all the tips, also consider that you might have a chip or flaw on the needle you are using.
For issues with thread breaking…well, this is where you will regret it if you have a cheaper quality thread. I also like to use a thread stand for feeding my cones of thread. These are inexpensive ($10 to $12) and readily available. I recommend a thread stand whenever you are working with specialty threads or large spools. If you don’t have one, it’s a good investment.
Visual Aids: I have found some videos on YouTube, but some are for a different project (the Camden Bowl) and some are for an older version of the Camden Bag. So, use caution when searching YouTube. You might end up more confused than when you started.
Take a look at the photos on page 2 and 3 of the pattern. If you want a bit more, additional photos are provided below for all the steps in Session Two.
Overview of Session Two: I assume that everyone is using the updated version of the pattern, shown above. When I refer to pattern pages, they are pages on the updated pattern. By the end of Session Two, you will have completed almost everything on pages 2 and 3 of the pattern.
Your steps for this session are to: (1) fuse the fabric strips to the Bosal strips, (2) straight stitch the individual strips to make “tubes”, (3) zigzag tubes together.
By the end of Session Two you will end up with a rectangle made of 16 stitched tubes that measures approximately 9” by 42”. See Photo 7 below.
Here we go…
Step 1 - Fuse the Strips:
Follow the pattern directions (page 2) for fusing the fabric strips to the Bosal strips…and, check out the visual aids below, for more help.
Step 1 - Fuse the Strips:
Follow the pattern directions (page 2) for fusing the fabric strips to the Bosal strips…and, check out the visual aids below, for more help.
Step 2 - Straight Stitch to Make Tubes:
This is covered on Page 2, under the heading SEWING DIRECTIONS. You can use a general-purpose foot on your machine, or you may prefer a walking foot. Note that you want to use your Denim (Jeans) size 110/18 needle for this. I have had several questions about this needle, so let me clear them up here:
1-A Denim needle is the same thing as a Jeans needle.
2- A size 110 needle is the same as a size 18.
3-Not every size 110/18 is a Denim (Jeans needle). If the needle is not labeled Denim (Jeans) it is not a Denim (Jeans) needle. If you have a Universal or Microtex or Leather size 110/18, you don’t have a Denim (Jeans) and you need to buy one in order to punch through all the layers. Don’t use a Leather needle; that is deigned for leather and will ruin your fabric.
4- You don’t need to buy the specific brands of needles listed on the pattern (Inspira, Janome). But you do need a Denim (Jeans) needle. And it should be a size 110/18. A size 100/16 is not the size you need.
Step 3 - Zigzag the Tubes Together:
Directions start at the bottom of page 2 and continue on pattern page 3.
Helpful Hint before you get started sewing the tubes together: You probably have some variation in the length of your 2 ½” strips. You will note that, on page 3 of the pattern, you are told to make sure you don’t let the fabric tubes get stretched unevenly as you are zigzagging them together. Great…but, how do you know the tubes are being stretched out of shape if you start with tubes of all different lengths? Here is my big tip: After you have made the tubes, but BEFORE you sew any of the tubes together, trim them all to 42”. That way, you can line up the ends of the tubes as you are sewing. In a later step, you will be trimming down to 40”, so you will still have plenty of length to work with after trimming to 42” now.
Trouble Shooting: If your machine is skipping stitches on the zigzag, you can read the tips included in the pattern! Note that directions tell you to SEW SLOWLY. You are asking a lot of your machine, and it will skip stitches on the zigzag if you start zipping along. If you have tried all the tips, also consider that you might have a chip or flaw on the needle you are using.
For issues with thread breaking…well, this is where you will regret it if you have a cheaper quality thread. I also like to use a thread stand for feeding my cones of thread. These are inexpensive ($10 to $12) and readily available. I recommend a thread stand whenever you are working with specialty threads or large spools. If you don’t have one, it’s a good investment.
Visual Aids: I have found some videos on YouTube, but some are for a different project (the Camden Bowl) and some are for an older version of the Camden Bag. So, use caution when searching YouTube. You might end up more confused than when you started.
Take a look at the photos on page 2 and 3 of the pattern. If you want a bit more, additional photos are provided below for all the steps in Session Two.
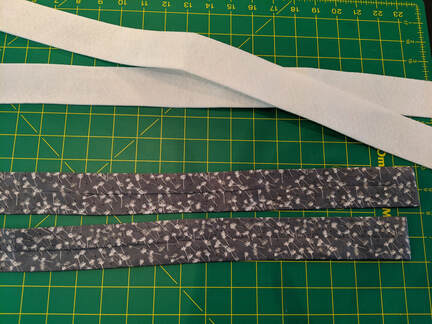
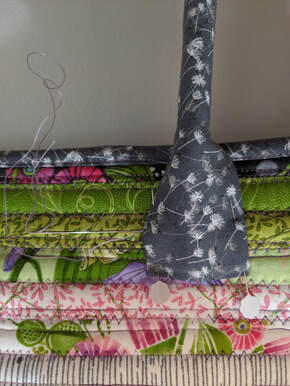
Bosal on Fabric Strip
(Session 2 -- Photo 1)
(Session 2 -- Photo 1)

Ironing a Strip with Bosal
(Session 2 -- Photo 2)
(Session 2 -- Photo 2)

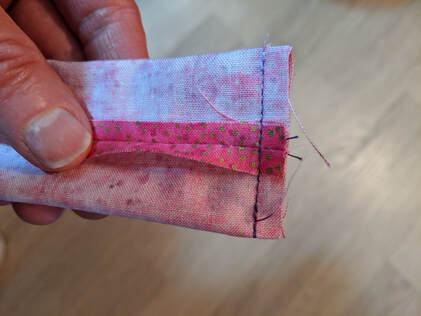
Sewing a Fabric Strip Tube
(Session 2 -- Photo 3)
(Session 2 -- Photo 3)
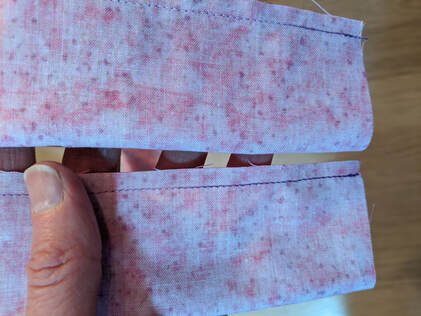
Zigzagging a Pair of Tubes
(Session 2 -- Photo 4)
(Session 2 -- Photo 4)
Four Sets of Four Tubes
(Session 2 -- Photo 5)
(Session 2 -- Photo 5)
Zigzagging a Set of Four
(Session 2 --Photo 6)
(Session 2 --Photo 6)
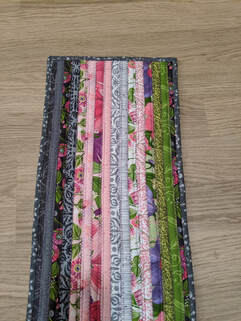
All 16 Tubes 9" X 42"
(Session 2 -- Photo 7)
(Session 2 -- Photo 7)

Session Three – Side Binding and Bottom
Overview of Session Three: We will be working through the directions from the very end of page 3 of the pattern and down through most of page 6. This session stops just before the section titled ADD HANDLES AND BUTTONS.
Note that we have posted quite a few photos after these written notes for Session Three. Note that I have been working on a couple of different bags at once, so the photos are not all from the same bag; colors and fabrics vary, but the techniques are the same.
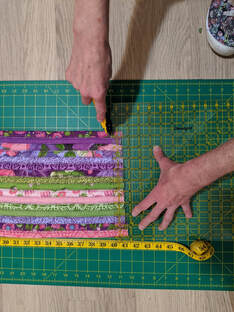
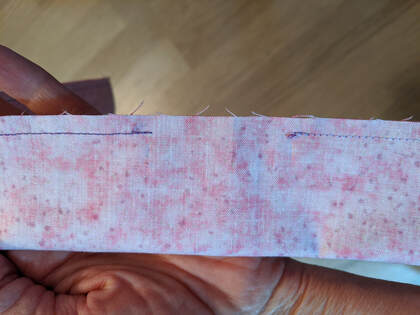
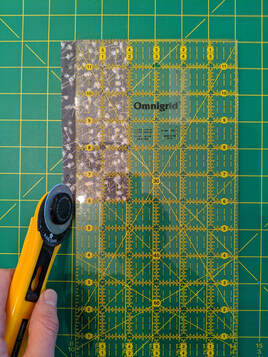
Trimming Down the Rectangle: By now you have made your 16 “tubes” and have them assembled into a rectangle made of 16 tubes. It kind of drives me crazy that the pattern tells you to trim this rectangle down to 9” by 40.” What the directions really should say is that you need to trim the length of the rectangle down to 40.” Before trimming, your rectangle should measure about 42” long. This means that you can trim any jagged edges from either end. DO NOT trim your rectangle down to an exact 9.” Leave the rectangle whatever measurement is has come out to…mine is about 9½.” You have just finished carefully making those tubes that enclose all the strips of batting, and you will cut open those tubes if you try to trim them down! So…don’t. (See photos below).
Binding the Sides: Now is the time to put in the size 90 Microtex needle.
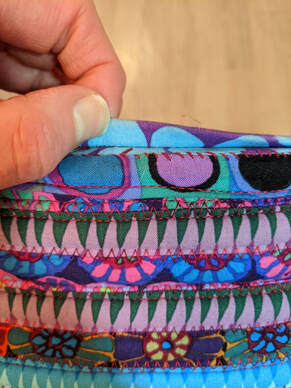
O.K., now we are at the top of page 4 on the pattern directions. I assume all of you can put a binding onto a rectangular quilt. Great! Treat this rectangle the same way you would a quilt, and bind it. The pattern assumes the standard method of binding, with strips pressed wrong sides together (they use 2½” strips).
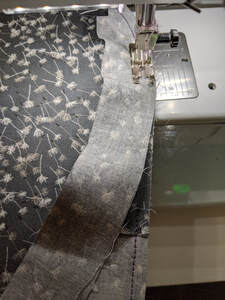
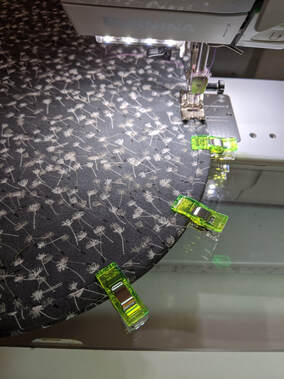
Of course, I have a few comments on binding. The pattern tells you to sew the binding to the outside and then sew it down by hand or machine on the inside of the bag. My sister prefers the look of the neatly sewn hand binding, which is what she did for her bag, following the directions. I decided to sew my binding entirely by machine. Whenever I do a binding that way, I stitch the binding to the INSIDE of the bag (as I would the back side of a quilt) because then I can see my topstitching as I am doing it on the outside of the bag. Whenever I have tried it the other way around, I just haven’t been as happy with the look. There are a lot of lines of stitching, and if you have very busy fabric, it may not make a difference to you, but I deviated from the pattern directions a bit in this step. None of the approaches will make a difference as to whether your bag holds together; it’s purely a question of looks. Even when I stitch my binding down entirely by machine…well, I actually sew the corners by hand before I stitch the edge by machine. It keeps my corners from popping up. Pinning the binding is a pain, so I liked the clips for holding my binding in place as I was sewing the edges down. (Photos below)
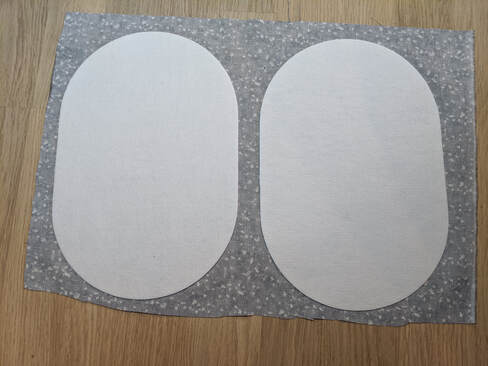
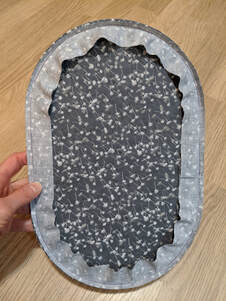
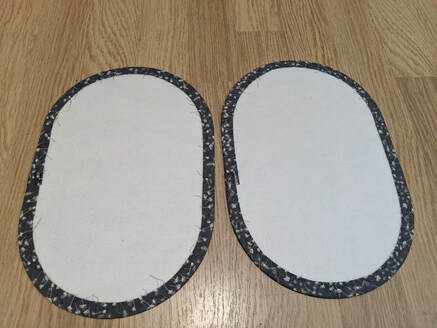
Making the Bottom: We are still on page 4 of the pattern directions. Ignore all the directions about drafting your own pattern for the bottom…we are using those handy pre-cut bottoms that are the perfect size and shape!
To be clear, your package of Camden Bag bottoms comes with TWO bottoms: you need to follow the fusing and binding directions for EACH of those two bottoms. Directions start at the very bottom of page 4 and continue on page 5. I think the directions are clear, but I had to read them a few times. I have posted a few photos below because photos always help.
This is one step for which you will need to protect your ironing surface because the Craf-Tex Camden Bag bottoms are a double-sided fusible product. One side of that fusible bottom will face the ironing surface, so protect the ironing surface with the parchment paper or non-stick pressing sheet (as the directions tell you to).
Note: For an extra touch of whimsy, I personalized my bag by fusing a couple of fabric motifs to the right side of one of the fused bottom pieces, and then I held them in place with a little zigzag stitch. I also stitched on a label with a straight stitch. If you decide to personalize you bag in this way, do so before you fuse the two bottoms together.
Now you are ready to bind each of the sides of the fused bottoms. Again, I find the directions good, but thought you could benefit from a few more photos of the bottom construction (see below). Good news! You are well on page 5 of the pattern directions and making good progress. Your bag is about to take shape.
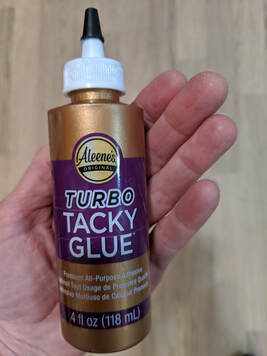
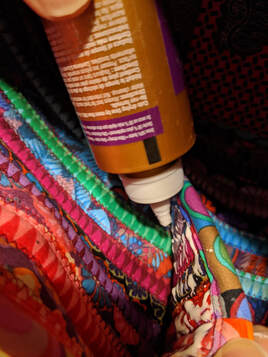
Sewing the Bottom to the Sides: The pattern has excellent photos that show how to pin the bottom to the sides (the designers call the 9” by 40” rectangle of tubes the “side”). Directions start on page 5 and continue on page 6. You will note that the pattern directions tell you to stitch through all the layers when you are stitching the vertical seam up the side. Moira did this and reports that it was tough going, but of course she got it done. I lazed off and didn’t go all the way through the layers. My bag is holding together just fine. Our friend Jan Mott tried a different approach…adding glue. So, I went back and applied glue to my bag, to hold the extra part of the flap on the inside that was not held down by stitching (because I didn’t go through all the layers). Guess what? It works fine. It’s strictly optional, and if you decide to try it, I recommend using Aleene’s Original Tacky Glue or Aleene’s Original Turbo Tacky Glue (the Turbo dries faster).
Coming Up Next:
Most of your bag construction will be complete by the end of this session. You will just have the handles and buttons left.
Overview of Session Three: We will be working through the directions from the very end of page 3 of the pattern and down through most of page 6. This session stops just before the section titled ADD HANDLES AND BUTTONS.
Note that we have posted quite a few photos after these written notes for Session Three. Note that I have been working on a couple of different bags at once, so the photos are not all from the same bag; colors and fabrics vary, but the techniques are the same.
Trimming Down the Rectangle: By now you have made your 16 “tubes” and have them assembled into a rectangle made of 16 tubes. It kind of drives me crazy that the pattern tells you to trim this rectangle down to 9” by 40.” What the directions really should say is that you need to trim the length of the rectangle down to 40.” Before trimming, your rectangle should measure about 42” long. This means that you can trim any jagged edges from either end. DO NOT trim your rectangle down to an exact 9.” Leave the rectangle whatever measurement is has come out to…mine is about 9½.” You have just finished carefully making those tubes that enclose all the strips of batting, and you will cut open those tubes if you try to trim them down! So…don’t. (See photos below).
Binding the Sides: Now is the time to put in the size 90 Microtex needle.
O.K., now we are at the top of page 4 on the pattern directions. I assume all of you can put a binding onto a rectangular quilt. Great! Treat this rectangle the same way you would a quilt, and bind it. The pattern assumes the standard method of binding, with strips pressed wrong sides together (they use 2½” strips).
Of course, I have a few comments on binding. The pattern tells you to sew the binding to the outside and then sew it down by hand or machine on the inside of the bag. My sister prefers the look of the neatly sewn hand binding, which is what she did for her bag, following the directions. I decided to sew my binding entirely by machine. Whenever I do a binding that way, I stitch the binding to the INSIDE of the bag (as I would the back side of a quilt) because then I can see my topstitching as I am doing it on the outside of the bag. Whenever I have tried it the other way around, I just haven’t been as happy with the look. There are a lot of lines of stitching, and if you have very busy fabric, it may not make a difference to you, but I deviated from the pattern directions a bit in this step. None of the approaches will make a difference as to whether your bag holds together; it’s purely a question of looks. Even when I stitch my binding down entirely by machine…well, I actually sew the corners by hand before I stitch the edge by machine. It keeps my corners from popping up. Pinning the binding is a pain, so I liked the clips for holding my binding in place as I was sewing the edges down. (Photos below)
Making the Bottom: We are still on page 4 of the pattern directions. Ignore all the directions about drafting your own pattern for the bottom…we are using those handy pre-cut bottoms that are the perfect size and shape!
To be clear, your package of Camden Bag bottoms comes with TWO bottoms: you need to follow the fusing and binding directions for EACH of those two bottoms. Directions start at the very bottom of page 4 and continue on page 5. I think the directions are clear, but I had to read them a few times. I have posted a few photos below because photos always help.
This is one step for which you will need to protect your ironing surface because the Craf-Tex Camden Bag bottoms are a double-sided fusible product. One side of that fusible bottom will face the ironing surface, so protect the ironing surface with the parchment paper or non-stick pressing sheet (as the directions tell you to).
Note: For an extra touch of whimsy, I personalized my bag by fusing a couple of fabric motifs to the right side of one of the fused bottom pieces, and then I held them in place with a little zigzag stitch. I also stitched on a label with a straight stitch. If you decide to personalize you bag in this way, do so before you fuse the two bottoms together.
Now you are ready to bind each of the sides of the fused bottoms. Again, I find the directions good, but thought you could benefit from a few more photos of the bottom construction (see below). Good news! You are well on page 5 of the pattern directions and making good progress. Your bag is about to take shape.
Sewing the Bottom to the Sides: The pattern has excellent photos that show how to pin the bottom to the sides (the designers call the 9” by 40” rectangle of tubes the “side”). Directions start on page 5 and continue on page 6. You will note that the pattern directions tell you to stitch through all the layers when you are stitching the vertical seam up the side. Moira did this and reports that it was tough going, but of course she got it done. I lazed off and didn’t go all the way through the layers. My bag is holding together just fine. Our friend Jan Mott tried a different approach…adding glue. So, I went back and applied glue to my bag, to hold the extra part of the flap on the inside that was not held down by stitching (because I didn’t go through all the layers). Guess what? It works fine. It’s strictly optional, and if you decide to try it, I recommend using Aleene’s Original Tacky Glue or Aleene’s Original Turbo Tacky Glue (the Turbo dries faster).
Coming Up Next:
Most of your bag construction will be complete by the end of this session. You will just have the handles and buttons left.
Trim Rectangle
(Session 3 -- Photo 1)
(Session 3 -- Photo 1)
Cut Sides Only
(Session 3 -- Photo 2)
(Session 3 -- Photo 2)
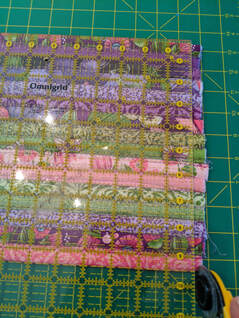
Ready to Make Binding
(Session 3 -- Photo 3)
(Session 3 -- Photo 3)

Stitch Down Binding
(Session 3 -- Photo 4)
(Session 3 -- Photo 4)

Finished Binding
(Session 3 -- Photo 5)
(Session 3 -- Photo 5)
Protect Your Ironing Surface
(Session 3 -- Photo 6)
(Session 3 -- Photo 6)
Fused Bottoms
(Session 3 -- Photo 7)
(Session 3 -- Photo 7)
Personalized Additions
(Session 3 -- Photo 8)
(Session 3 -- Photo 8)

Binding Bottom
(Session 3 -- Photo 9)
(Session 3 -- Photo 9)
Binding on Bottom
(Session 3 -- Photo 10)
(Session 3 -- Photo 10)
Both Bindings Complete
(Session 3 -- Photo 11)
(Session 3 -- Photo 11)
Sewing Bottoms Together
(Session 3 -- Photo 12)
(Session 3 -- Photo 12)
Finished Bottoms
(Session 3 -- Photo 13)
(Session 3 -- Photo 13)

Side Sewn to Bottom
(Session 3 -- Photo 14)
(Session 3 -- Photo 14)
Sewing up the Side
(Session 3 -- Photo 15)
(Session 3 -- Photo 15)

Sewing Across Top
(Session 3 -- Photo 16)
(Session 3 -- Photo 16)

Aleene's Glue
(Session 3 -- Photo 17)
(Session 3 -- Photo 17)
Glue Flap Inside
(Session 3 -- Photo 18)
(Session 3 -- Photo 18)
Session Four – Finishing with Handles and Buttons
Overview of Session Four: You have most of the work behind you now! In this session, you will be putting on the finishing touches…making and attaching the handles, then adding decorative buttons. You really have just one big paragraph of directions left to follow, starting on the bottom of page 6 and finishing on the top of page 7. You will begin with the heading ADD HANDLES AND BUTTONS at the bottom of page 6.
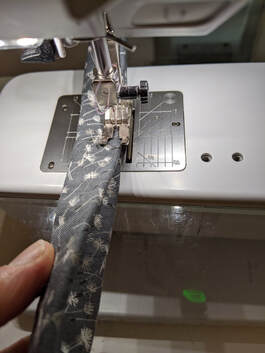
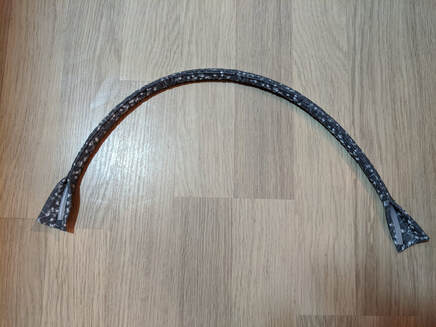
Making the Handles: Again, I found the directions pretty clear, but I think photos will help you avoid misunderstandings and mistakes. Take a look at the photos below if you want clarification.
One thing to note is that you first sew just the long sides of each handle strip. The pattern tells you to leave an opening in the middle of the strip for turning. Yes, that is essential…but don’t turn it just yet. Stitch across each of the ends first, and then turn the tube right side out (photos below). I really like this way of making the handles because it gives you crisp, neat ends for the handles. The opening that you leave for turning (and later for inserting the interfacing) will be completely enclosed in a later step. So, don’t worry if it doesn’t look pretty…it’s not going to show!
For those of you who purchased the “Happy Handles” kit, note that your strip of interfacing is longer than you need; remember to cut it to size before you insert it into the opening of the handle.
Attaching the Handles: There are not placement marks or measurements for the handles. I used the long pins to hold the handles in place and shifted them around until I was happy with the placement.
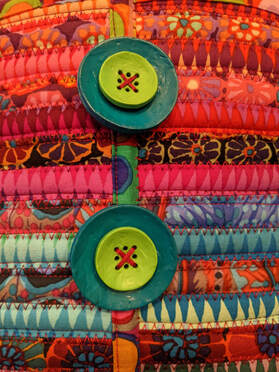
Attaching the Buttons: The pattern shows two large buttons, but I have seen bags with three, or you may not want any buttons. There are no placement marks for the buttons. My only recommendation is that I would not sew buttons very low…it will be hard to reach down into the bag and manipulate your needle and thread if you place the buttons near the bottom of the bag. The designers used double buttons, stacking one button on top of the other to add contrast and dimension. I chose to use that idea on my first bag because I had a lot of bright and busy prints, but I don’t think that will work for every bag.
Next Steps: Obviously, set the bag on a table and see how long it takes for your cat to jump into it. If you don’t have a cat, you can fill the bag with decorative objects, sewing tools, or supplies for a small project. I love mine as a tote to take along when out shopping for craft supplies because it easily holds my wallet, plus an assortment of items that I am always trying to match. Then, I can just toss the new supplies into the tote, and I am all set for my project when I get home.
I like to have a place to clip my keys to a bag, so I am going to experiment with making a matching fabric tie that I can add to the Camden Bag, either tied onto a handle or sewn to the inside edge. If that works out, I will post directions in a Bonus Session. If it doesn’t work out, well…I guess I will have to tie a ribbon to the handle instead. Stay tuned!
Overview of Session Four: You have most of the work behind you now! In this session, you will be putting on the finishing touches…making and attaching the handles, then adding decorative buttons. You really have just one big paragraph of directions left to follow, starting on the bottom of page 6 and finishing on the top of page 7. You will begin with the heading ADD HANDLES AND BUTTONS at the bottom of page 6.
Making the Handles: Again, I found the directions pretty clear, but I think photos will help you avoid misunderstandings and mistakes. Take a look at the photos below if you want clarification.
One thing to note is that you first sew just the long sides of each handle strip. The pattern tells you to leave an opening in the middle of the strip for turning. Yes, that is essential…but don’t turn it just yet. Stitch across each of the ends first, and then turn the tube right side out (photos below). I really like this way of making the handles because it gives you crisp, neat ends for the handles. The opening that you leave for turning (and later for inserting the interfacing) will be completely enclosed in a later step. So, don’t worry if it doesn’t look pretty…it’s not going to show!
For those of you who purchased the “Happy Handles” kit, note that your strip of interfacing is longer than you need; remember to cut it to size before you insert it into the opening of the handle.
Attaching the Handles: There are not placement marks or measurements for the handles. I used the long pins to hold the handles in place and shifted them around until I was happy with the placement.
Attaching the Buttons: The pattern shows two large buttons, but I have seen bags with three, or you may not want any buttons. There are no placement marks for the buttons. My only recommendation is that I would not sew buttons very low…it will be hard to reach down into the bag and manipulate your needle and thread if you place the buttons near the bottom of the bag. The designers used double buttons, stacking one button on top of the other to add contrast and dimension. I chose to use that idea on my first bag because I had a lot of bright and busy prints, but I don’t think that will work for every bag.
Next Steps: Obviously, set the bag on a table and see how long it takes for your cat to jump into it. If you don’t have a cat, you can fill the bag with decorative objects, sewing tools, or supplies for a small project. I love mine as a tote to take along when out shopping for craft supplies because it easily holds my wallet, plus an assortment of items that I am always trying to match. Then, I can just toss the new supplies into the tote, and I am all set for my project when I get home.
I like to have a place to clip my keys to a bag, so I am going to experiment with making a matching fabric tie that I can add to the Camden Bag, either tied onto a handle or sewn to the inside edge. If that works out, I will post directions in a Bonus Session. If it doesn’t work out, well…I guess I will have to tie a ribbon to the handle instead. Stay tuned!
Starting the Handles
(Session 4 -- Photo 1)
(Session 4 -- Photo 1)
Leave a Center Opening
(Session 4 -- Photo 2)
(Session 4 -- Photo 2)
Leave the Ends Open
(Session 4 -- Photo 3)
(Session 4 -- Photo 3)
Stitch the Ends
(Session 4 -- Photo 4)
(Session 4 -- Photo 4)
Straps Turned and Pressed
(Session 4 -- Photo 5)
(Session 4 -- Photo 5)
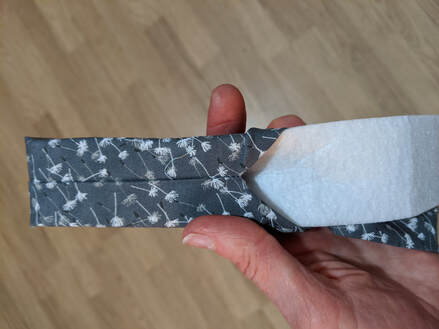
Insert the Interfacing
(Session 4 -- Photo 6)
(Session 4 -- Photo 6)
Stitching the Channel
(Session 4 -- Photo 7)
(Session 4 -- Photo 7)
Insert the Tubing
(Session 4 -- Photo 8)
(Session 4 -- Photo 8)

Finished Handle
(Session 4 -- Photo 9)
(Session 4 -- Photo 9)
Attaching Handles
(Session 4 -- Photo 10)
(Session 4 -- Photo 10)
Buttons on Bag
(Session 4 -- Photo 11)
(Session 4 -- Photo 11)
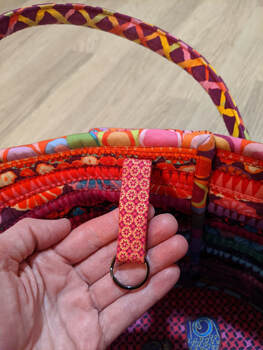
Camden Bag Bonus – Key Holder
Overview of Session Four: I wanted to come up with a matching loop or strap that I would add to the inside of my bag. Sometimes I use my Camden Bag at home for holding project supplies. But other times, I like to take the bag one the go, whether at a quilt meeting or running errands. I never seem to leave myself enough time when I am tossing a bunch of random items into my bag. It has become essential for me to have some way to attach the only way I can be sure of making it back home.
There are photos below showing the steps, with a couple of options.
Supplies and Materials: A strip of fabric 2” X 6” (can be cut from leftover binding fabric)
Matching machine and hand sewing thread (regular 50 wt. thread)
Metal ring (about 1”)
or metal ring with attached clip (metal swivel lanyard snap hook)
Sewing machine, pins, scissors, miscellaneous sewing tools
Where to find metal ring (with or without clip)? I found tons of options online by searching for “keychain supplies.” I used a simple split ring because my keychain already has a snap hook attached. The photos below show options. You might have an extra ring or findings from a purse or an old keychain sitting around in a drawer, just waiting for this project.
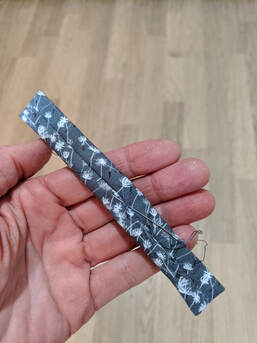
Making the Loop: The construction of the loop is similar to the construction of the handles you just made for your bag. Fold the 2” X 6” strip of fabric in half the long way, right sides together. Stitch the long edge only, leaving open about a 1½” area in the middle and leaving the ends open. Flatten the sewn strip, with the seam facing up, centered evenly. Stitch across each of the ends. Turn right side out through the opening. Stitch the opening closed by hand.
Adding the Ring Before sewing the loop to the bag, feed the loop through the ring, and hand sew the ends together. Using the same thread, sew the loop to the inside of the bag. I first tried to attach the loop using the heavy-duty thread that I had used for stitching the bag together. I just didn’t like that look. The loop is fairly narrow, and using the heavy thread with the sturdy long needle…it made for some big and clunky stitches when sewing the loop to the inside of the bag. There just isn’t room to maneuver, and I was happier regular 50 wt. sewing thread and a small needle. I doubled my thread.
Finished: Congratulations again! Your Camden Bag was already complete, but this simple loop is an extra little touch to add to your bag.
I hope you have enjoyed making your bag. Who knows? You might already be planning your next one.
Overview of Session Four: I wanted to come up with a matching loop or strap that I would add to the inside of my bag. Sometimes I use my Camden Bag at home for holding project supplies. But other times, I like to take the bag one the go, whether at a quilt meeting or running errands. I never seem to leave myself enough time when I am tossing a bunch of random items into my bag. It has become essential for me to have some way to attach the only way I can be sure of making it back home.
There are photos below showing the steps, with a couple of options.
Supplies and Materials: A strip of fabric 2” X 6” (can be cut from leftover binding fabric)
Matching machine and hand sewing thread (regular 50 wt. thread)
Metal ring (about 1”)
or metal ring with attached clip (metal swivel lanyard snap hook)
Sewing machine, pins, scissors, miscellaneous sewing tools
Where to find metal ring (with or without clip)? I found tons of options online by searching for “keychain supplies.” I used a simple split ring because my keychain already has a snap hook attached. The photos below show options. You might have an extra ring or findings from a purse or an old keychain sitting around in a drawer, just waiting for this project.
Making the Loop: The construction of the loop is similar to the construction of the handles you just made for your bag. Fold the 2” X 6” strip of fabric in half the long way, right sides together. Stitch the long edge only, leaving open about a 1½” area in the middle and leaving the ends open. Flatten the sewn strip, with the seam facing up, centered evenly. Stitch across each of the ends. Turn right side out through the opening. Stitch the opening closed by hand.
Adding the Ring Before sewing the loop to the bag, feed the loop through the ring, and hand sew the ends together. Using the same thread, sew the loop to the inside of the bag. I first tried to attach the loop using the heavy-duty thread that I had used for stitching the bag together. I just didn’t like that look. The loop is fairly narrow, and using the heavy thread with the sturdy long needle…it made for some big and clunky stitches when sewing the loop to the inside of the bag. There just isn’t room to maneuver, and I was happier regular 50 wt. sewing thread and a small needle. I doubled my thread.
Finished: Congratulations again! Your Camden Bag was already complete, but this simple loop is an extra little touch to add to your bag.
I hope you have enjoyed making your bag. Who knows? You might already be planning your next one.
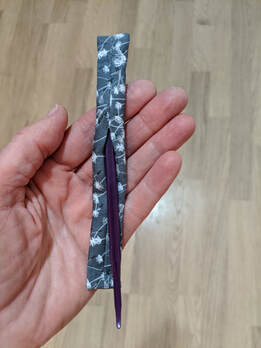
Cut Strip
(Bonus Session -- Photo 1)
(Bonus Session -- Photo 1)
Sew Long Side
(Bonus Session -- Photo 2)
(Bonus Session -- Photo 2)
Middle and Ends Open
(Bonus Session -- Photo 3)
(Bonus Session -- Photo 3)
Stitch Across Ends
(Bonus Session -- Photo 4)
(Bonus Session -- Photo 4)
Turn Right Side Out
(Bonus Session -- Photo 5)
(Bonus Session -- Photo 5)
Stitch Closed
(Bonus Session -- Photo 6)
(Bonus Session -- Photo 6)
Loop with Swivel Hook
(Bonus Session -- Photo 7)
(Bonus Session -- Photo 7)
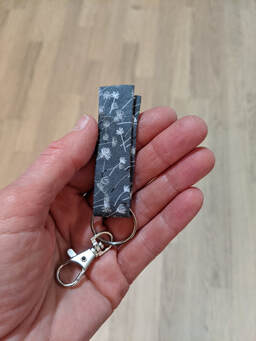
Loop with Ring
(Bonus Session -- Photo 8)
(Bonus Session -- Photo 8)
Loop on Bag
(Bonus Session -- Photo 9)
(Bonus Session -- Photo 9)