Fall / Spring Workshops
The Spring 2020 workshop has been cancelled due to the covid-19 pandemic.
The teacher for the Fall 2020 workshops will be Bonnie Hunter, a well known quilter, designer, author, and teacher. Details are yet to be worked out, but the workshops will be held on October 5 and 6, at Ivy Creek Methodist Church.
The teacher for the Fall 2020 workshops will be Bonnie Hunter, a well known quilter, designer, author, and teacher. Details are yet to be worked out, but the workshops will be held on October 5 and 6, at Ivy Creek Methodist Church.
Mini Workshop
Basic Embroidery III
Instructors: Moira MacAvoy and Ellen MacAvoy
When and where:
CHOOSE ONLY ONE SESSION
Tuesday, February 18th
From 1:00 pm to 3:30 pm
Location: Ivy Creek United Methodist Church
684 Woodlands Rd, Charlottesville, VA 22901
OR
Wednesday, February 19th
From 6:30-9:00 pm
Location: The Community Room at the Shops at Stonefield
On Bond Street, across from the Regal Stonefield movie theater
In this workshop, which is the third in our Hand Embroidery series, you will learn basic chain stitch plus a few variations including: Detached Chain, Threaded Chain, Zig-Zag Chain and Spine Chain. We will show you how to use these stitches to create motifs, with which you can embellish your sewing projects or work embroidery designs. You may choose to stitch a landscape or a seascape, as show below, or create your own.
If you are new to hand embroidery you may prefer to learn just a few of the chain stitch variations, and that’s fine. We want this to be fun, not stressful. Those of you who are more experienced and adventurous may enjoy learning Cable Chain, Heavy Chain, Square Chain and Tete de Boeuf. There should be something for everyone!
If you missed Part 1 or Part 2 of the Embroidery Stitches series…no worries. They are not a prerequisite for this workshop.
What you need to bring:
5 or 6-inch hand embroidery hoop (not a machine embroidery hoop)
Frixion Pen- Be sure it is a newish pen, capable of marking fabric (not a disappearing ink marker; they don’t work on this fabric)
Pencil for drawing designs on paper
Small scissors for cutting thread
Threads:
You should have at least a couple of colors of perle cotton, preferably DMC #8 or Valdani #12. In addition, you can bring DMC floss, silk ribbon, and any other embroidery threads you would like to use for your chain stitches. Size 2 mm or 4 mm silk ribbon make beautiful chain stitches, and this is a good chance to experiment with your silk ribbon. Tan or light gray would not be good color choices for the fabric provided. You can share threads with classmates.
Optional Needles:
Size 24 chenille needle if you have it
Size 24 tapestry needle for lacing stitches
Size 22 chenille needle if you are using silk ribbon
Optional…Thimble if you normally use one for hand sewing, or thimble pads, which you make want for your “off” hand.
Also Optional: A light box, if you own one and want to trace a design. We will have extra light boxes to share. You can also doodle or draw free hand.
The Kit:
Your class kit will include:
8.5 x 11 piece of linen + another piece of linen to practice on.
Bohin Crewel Needle Size 7
General Instructions
Patterns for Landscape and Seascape
Extra paper for drawing your own design
There will be a kit fee of $5.00 for these supplies, payable to Moira MacAvoy at the workshop.
Cost:
This mini workshop is open to all CAQG members at no charge for the instruction. There is a kit fee of $5.00 as noted above.
How to sign up:
To reserve a place in the workshop via email to Ellen MacAvoy…
CLICK ON THE EMAIL ADDRESS RIGHT HERE: [email protected]
Or use 770-480-7704 for text message or phone call. Please include your first and last name when you sign up.
Space is limited and will be assigned on a first come, first served basis.
If you do not use your own email or cell phone to sign up, be sure to provide a way to contact you. You will receive a confirmation by email (or text message or phone call) to let you know that you have a spot reserved in the class. If you have not received a confirmation within 24 hours, your communication has gone astray, and you do not have a spot in the class, so please follow up with Ellen.
Cancellation Policy:
Please be considerate of your teacher and cancel early if you know you have a change of plans. Knowing the number of students to expect will help us when cutting kits and when setting up the class space on the day of the workshop.
How to Cancel:
Early Cancellations: Unexpected things come up. If you need to cancel more than 24 hours before the mini-workshop begins, please email your mini-workshop coordinator, Ellen MacAvoy [email protected]
Late Cancellations: Help our coordinator and teachers as they manage the many details involved on the day of the mini-workshop. We need a final attendance number as we make decisions about setting up the room on the day of the workshop. Don’t leave us standing around, waiting to see if there are later comers versus no-shows. If you need to cancel your attendance and the start of the mini-workshop is less than 24 hours in the future, then contact Ellen MacAvoy directly by a text message or phone call at 770-480-7704. An email is not sufficient for late cancellations.
Bad Weather Cancellations:
If the schools in Albemarle County are closed because of snow or other weather events, then our workshop is automatically cancelled. We do not promise to send out a cancellation notice that morning because our power and/or Internet service could be out, making it impossible to honor that promise. Please plan accordingly.
Cell phone policy: Refrain from engaging in cell phone calls in the mini workshop area. Many of us must be on call for emergencies. Please leave your phone on silent, if out on the table, or on vibrate if in your purse/pocket. Step completely away from the workshop area if you need to engage in a cell phone call.

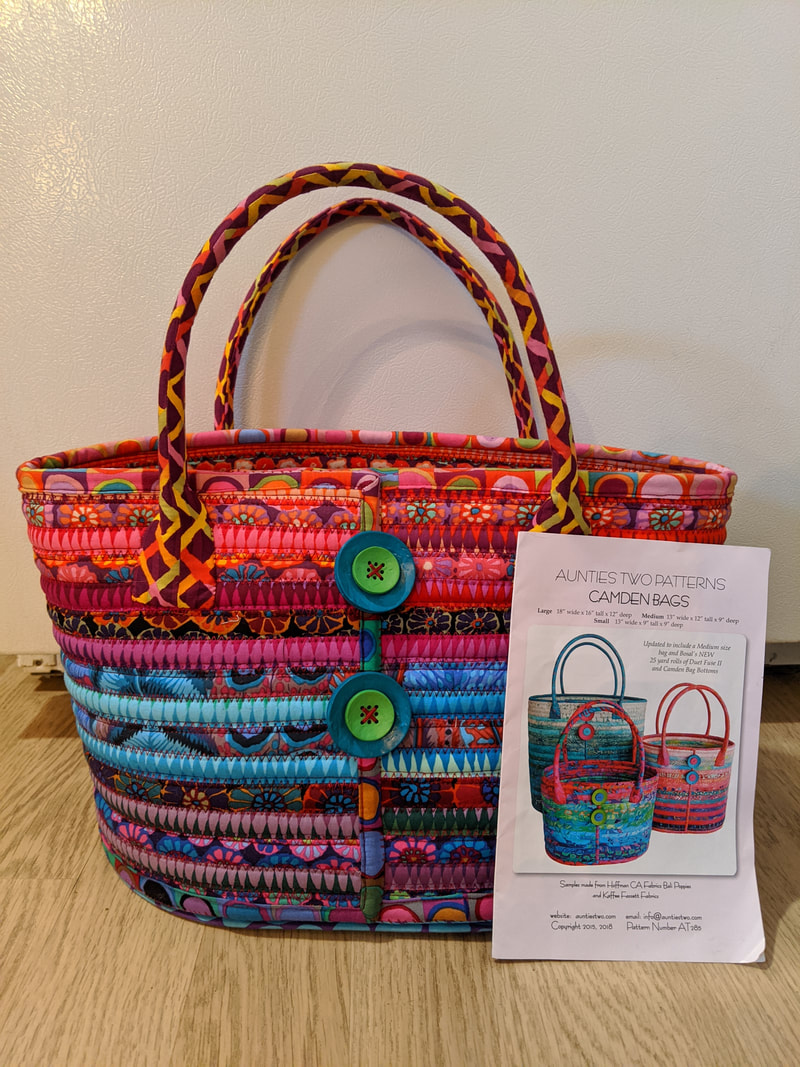
Camden Bag Sew-Along
Have you ever seen those beautiful jellyroll and Bali Pop strips and wonder what to make with them? Or maybe your stash has a lot of odds and ends that didn’t make it into a quilt? We have a great project for you! Check out the photograph at the side of this announcement.
Moira and Ellen MacAvoy will guide you through making the Camden Bag by Aunties Two Patterns. We will make the Small size, which is about 13” long by 9” wide by 9” tall (plus handles). The bag has an oval-shaped bottom, an open top, and two handles. It makes a sturdy shopping tote or project bag. One full-size jellyroll is enough for two bags, so you can use a smaller jellyroll, split a large one with a friend, or make two bags! Everyone’s bag will look different, depending on the choice of fabrics and buttons. Because a number of members can’t receive emails with large photo files, we are asking you to look at the photos of the bag online. You can click here on the link to the CAQG website www.caqg.weebly.com or simply search for the pattern on Amazon, Etsy, or Missouri Star Quilt Company. We are offering a learning format that’s off the path from our typical mini workshop. Instead of bringing your machines to a classroom, you will be able to complete the project at home, on your schedule, at your own pace. Think of it as a “virtual workshop.” If you choose, you can come to watch our 4-part series of live demos. The 30-minute sessions will be held on Tuesday mornings at 10:30 (details about dates and location follow). Information from each session will also be posted on the CAQG website. The project requires machine and hand sewing skills. Your machine needs to be able to do straight and zigzag stitching, and the hand stitching is functional (not decorative embroidery). Sign ups and Cost of Workshop: No need to sign up, and no fee to teachers. We recommend you wait until we go over the supplies if you are not sure you want to make the bag right now. Can’t Wait: For those who want to order the pattern now, you can look online. Be sure to buy the Aunties Two Patterns Camden Bag, the updated version with three bags (small, medium, large) pictured on the pattern. You can find them on Amazon, Missouri Star Quilt Company, and Etsy. If you aren’t sure you are buying the right pattern, please hold off on purchasing…that’s why we are devoting the first session to supplies and shopping tips! |

Live Demo Sessions: Each 30-minute session will be held at Aldersgate United Methodist Church at 10:30 am. 1500 East Rio Rd, Charlottesville, 22901. Session One: Tuesday, February 25th Session Two: Tuesday, March 10th Session Three: Tuesday, March 17th Session Four: Tuesday, March 24th Session One – Supplies: We will go over materials and tools you will need to assemble. The pattern lists a number of options for three different sizes of the Camden Bag. We will have a show and tell about what you need, and what you really don’t need to spend your money on, for making the Small size bag. We will have supplies on hand so you can see the packaging and labels. Then we will talk about where to purchase supplies (or what to look for in your stash!). Take note: Session One is just days before the Mid Atlantic Quilt Festival, which has an extensive vendor mall where you can find most or all of your supplies. Session Two – Preparing and Sewing Strips Session Three – Side Binding and Bottom Session Four – Finishing with Handles and Buttons |
